Tuesday, October 17, 2017

Copy all Azure Tables from one storage account to another

As a follow up to my previous post about copying blobs, here's how you can copy tables. This is even more rough around the edges than copying blobs. Firstly, you cannot just copy the table; you have to export it, then import it. Further, this cannot be done all in azure. When exporting, even if you use the command to export to blob container, it will download locally, then upload to the blob container so this can be quite a bit slower and incur additional charges so make sure you know what you're getting into.

The Script


cd 'C:\Program Files (x86)\Microsoft SDKs\Azure\AzCopy'

$sourceStorageAccountName = "SOURCE_STORAGE_ACCOUNT_NAME"
$sourceStorageAccountKey = "SOURCE_STORAGE_ACCOUNT_ACCESS_KEY"

$destStorageAccountName = "DESTINATION_STORAGE_ACCOUNT_NAME"
$destStorageAccountKey = "DESTINATION_STORAGE_ACCOUNT_ACCESS_KEY"
$destTemporaryContainerName = $(((Get-Date -Format o) -Replace '[^a-zA-Z0-9]','').ToLower())

$sourceStorageAccount = New-AzureStorageContext -StorageAccountName $sourceStorageAccountName -StorageAccountKey $sourceStorageAccountKey
$destStorageAccount = New-AzureStorageContext -StorageAccountName $destStorageAccountName -StorageAccountKey $destStorageAccountKey

$tables = Get-AzureStorageTable -Context $sourceStorageAccount
foreach($table in $tables) {
 Write-Host "Copying source table $($table.Name) from $($sourceStorageAccountName) to temporary storage container $($destTemporaryContainerName) on $($destStorageAccountName)"
 .\AzCopy.exe /Source:https://$sourceStorageAccountName.table.core.windows.net/$($table.Name)/ /Dest:https://$destStorageAccountName.blob.core.windows.net/$destTemporaryContainerName/ /SourceKey:$sourceStorageAccountKey /Destkey:$destStorageAccountKey /Manifest:"$($table.Name).manifest"
 Write-Host "Finished copying source table $($table.Name) from $($sourceStorageAccountName) to temporary storage container $($destTemporaryContainerName) on $($destStorageAccountName)"
 
 Write-Host "Importing data into destination table $($table.Name) from temporary storage container $($destTemporaryContainerName) on $($destStorageAccountName)"
 .\AzCopy.exe /Source:https://$destStorageAccountName.blob.core.windows.net/$destTemporaryContainerName/ /Dest:https://$destStorageAccountName.table.core.windows.net/$($table.Name)/ /SourceKey:$destStorageAccountKey /DestKey:$destStorageAccountKey /Manifest:"$($table.Name).manifest" /EntityOperation:"InsertOrReplace"
 Write-Host "Finished importing data into destination table $($table.Name) from temporary storage container $($destTemporaryContainerName) on $($destStorageAccountName)"
}

Write-Host "Deleting temporary storage container $($destTemporaryContainerName) on $($destStorageAccountName)"
Remove-AzureStorageContainer -Context $destStorageAccount -Name $destTemporaryContainerName -Force
Write-Host "Finished deleting temporary storage container $($destTemporaryContainerName) on $($destStorageAccountName)"

Copy all Azure Blob containers from one storage account to another

If you're using Azure Storage, you'll probably want to be able to clone storage account for testing purposes, setting up multiple environments, etc. To my surprise, there is not a very straight forward way to just clone a storage account.

AzCopy

AzCopy is a utility that helps move data to and from storage account. It has a method to copy data between storage accounts, but can only do a single container at a time. Not sure why they couldn't just make it do all containers, but it doesn't, so what are our options. Well, if you're developing for Azure, then PowerShell is probably going to be your best bet. You could technically write the entire transfer script using PowerShell, but AzCopy does a good job copying per container so let's just use PowerShell to iterate all the containers and have AzCopy do the work.

The Script


cd 'C:\Program Files (x86)\Microsoft SDKs\Azure\AzCopy'

$sourceStorageAccountName = "SOURCE_STORAGE_ACCOUNT_NAME"
$sourceStorageAccountKey = "SOURCE_STORAGE_ACCOUNT_ACCESS_KEY"

$destStorageAccountName = "DESTINATION_STORAGE_ACCOUNT_NAME"
$destStorageAccountKey = "DESTINATION_STORAGE_ACCOUNT_ACCESS_KEY"

$sourceStorageAccount = New-AzureStorageContext -StorageAccountName $sourceStorageAccountName -StorageAccountKey $sourceStorageAccountKey
$destStorageAccount = New-AzureStorageContext -StorageAccountName $destStorageAccountName -StorageAccountKey $destStorageAccountKey

$containers = Get-AzureStorageContainer -Context $sourceStorageAccount
foreach($container in $containers) {
 Write-Host "Copying container $($conatiner.Name) from $($sourceStorageAccountName) to $($destStorageAccountName)"
 .\AzCopy.exe /Source:https://$sourceStorageAccountName.blob.core.windows.net/$($container.Name) /SourceKey:$sourceStorageAccountKey /Dest:https://$destStorageAccountName.blob.core.windows.net/$($container.Name) /DestKey:$destStorageAccountKey /S
}


Durability

If for some reason your script terminates, just run the same command that just terminated and you'll be prompted whether you'd like to resume or restart the transfer. Cool!

Thursday, October 5, 2017

Restrict access to your Azure App Service to users in your Office 365 Active Directory

Recently I had the need to restrict access to my Asp.net core 2.0 application to only users in my Office 365 subscription. I was not able to find any good documentation of how to do this; everything I could find was outdated and didn't match with the screens I encountered. After struggling thru it, I finally got it working and here's how.

Office 365 & Azure Active Directory

The first thing that may not be obvious at first is that Office 365 uses Azure Active Directory to manage users. Because of this, any documentation referring to authentication with Azure Active Directory (AAD) pertains to Office 365 authentication.

These were the closest references I could find that eventually got me going, but they are against the old portal and using Azure not Office 365. I couldn't find anything that showed how to do it via Office 365.

Register the Application

As with all the tutorials, let us start by registering the application in Office 365. To do this, we'll need to get into AAD associated with the Office 365 subscription.
One way to do this...
  1. Login to Office 365
  2. Go to admin portal
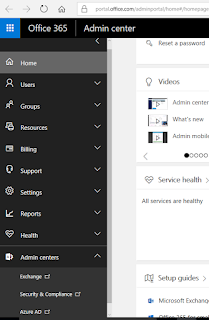
  3. From the navigation, expand Admin Centers and select Azure AD

App Registration

From the Azure Active Directory dashboard, pick App Registrations if it is visible in the left navigation, otherwise expand more services and select it there. You can star it to add to the left navigation if you want.

New application registration

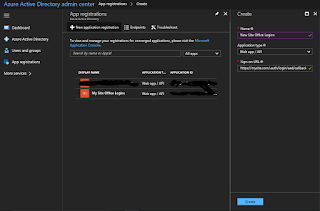
From the App Registrations blade, select New application registration. Provide a meaningful name for the application. You can enter the site's production url (note: make sure to prefix https:// if your site is secure) here with the suffix .auth/login/aad/callback to help fill in the next blades. Tab out of the field to enable the Create button. Click it and select the newly created application.

Reply Urls

The Sign-on URL provided during creation is automatically added to the Reply URLs for this application. One of the nice things about the registration is that we can specify multiple reply urls that are valid for this application. This allows us to specify staging, uat, testing, development urls that can all share this authentication (of course, be smart about it). Go ahead and add any you want now. You can always add more later.

Api Access Key (Client Secret)

Now select the Keys tab to create a key that our web app can use to identify itself to AAD. Enter a name for the token and select a duration for which the token will be valid. After saving, the secret will be shown. Make sure to grab it right away and save it somewhere safe. It will not be visible once you close that blade. This will be used as the client secret when enabling authentication.

App Service Authentication

Because I simply needed to know if the user is in my active directory and nothing else, App Service Authentication is the simplest way to get this going (of course, after hours of hair pulling due to lack of documentation; but now it's a breeze for future sites :D ).

Enable Authentication

Pick the Authentication / Authorization menu item and turn on App Service Authentication. Then select "Login with Azure Active Directory" from the "Action to take when request is not authenticated" dropdown.

Advanced Configuration

From the listed Authentication Providers, select Azure Active Directory. For the management mode, select Advanced. For the client ID, enter in the Application ID of the newly registered application.

Issuer Url
This was by far the most annoyingly difficult piece to figure out. It will be https://login.microsoftonline.com/{tenant-id} where {tenant-id} is the directory id. To get this url, go back to Office 365 App Registrations, and select the Endpoints top menu item. Copy any of the endpoints and delete everything past your tenant-id, which will be a GUID. (Ex, https://login.microsoftonline.com/xxxxxxxx-eeee-4b8a-a886-xxxd4xxxxxxx/federationmetadata/2007-06/federationmetadata.xml would be https://login.microsoftonline.com/xxxxxxxx-eeee-4b8a-a886-xxxd4xxxxxxx).

All said and done, it should look something like this:


Having all these steps outlined definitely makes it super simple to restrict access to an azure app service to users in an Office 365 subscription using all new portals!

Sunday, September 24, 2017

Create Azure Function Queues Automatically

I have been spending a lot of time working with Azure Functions lately and I really enjoy it, but there are a few pain points still. Automatically creating resources used by the Azure Functions does not seem to be in-the-box. Often, the functions you write need queues or other resources to function properly; meaning the queues may be an implementation detail to the azure functions. If you are a believer in continuous integration and deployment, then you probably have a way to deploy your functions anywhere, but...

Azure Resource Manager

Using Azure Resource Manager (ARM) templates, you can automatically deploy a service plan (consumption or reserved), and deploy your azure functions to that plan. You can also create a storage account and put the connection string to that account into the app setting of the deployed azure functions. However, you cannot create the queues or containers needed by the functions via ARM templates.

PowerShell

One can always take it upon themselves to write a powershell script that grabs the connection string and creates the resources, but now you have to maintain a powershell script with the same names used in your azure functions. This results in two places where magic strings needs to be in sync and while it is technically code, it is an unnecessary break from the programming model we are already using.

Reflection

What I tend to do instead, is some follow some basic conventions and use reflection over my azure functions. Here is what the top of most of my functions look like:

// Storage Helper in another file...
internal static class StorageSettings
{
 public static string ConnectionKey = "myStorageKeyInAppSettings";

 public static CloudStorageAccount StorageAccount { get; } = CloudStorageAccount.Parse(ConfigurationManager.ConnectionStrings[ConnectionKey].ConnectionString);

 public static Lazy<CloudBlobClient> BlobClientLazy = new Lazy<CloudBlobClient>(StorageAccount.CreateCloudBlobClient);
 public static CloudBlobClient BlobClient => BlobClientLazy.Value;

 publicstatic Lazy<CloudQueueClient> QueueClientLazy = new Lazy<CloudQueueClient>(StorageAccount.CreateCloudQueueClient);
 public static CloudQueueClient QueueClient => QueueClientLazy.Value;
}

// Functions class that has Queue resource dependencies
public static class Functions
{
 static Functions()
 {
  System.Diagnostics.Trace.TraceInformation($"Creating queues used by {nameof(Functions)}.");
  Task.WhenAll(QueueNames.Value.Select(x =>
   {
    System.Diagnostics.Trace.TraceInformation($"Creating queue {x} if not exists.");
    return StorageSettings.QueueClient.GetQueueReference(x).CreateIfNotExistsAsync();
   }))
   .GetAwaiter()
   .GetResult();
 }

 private const string StepOneQueueName = "step-one";
 private const string StepTwoQueueName = "step-two";

 private static readonly Lazy<string[]> QueueNames = new Lazy<string[]>(() =>
  typeof(Functions).GetRuntimeFields()
   .Where(x => x.IsLiteral
      && x.FieldType == typeof(string)
      && x.Name.EndsWith("QueueName"))
   .Select(x => (string)x.GetValue(null))
   .ToArray());

 public static async Task StepOneAsync(
  [QueueTrigger(StepOneQueueName, Connection = StorageSettings.ConnectionKey)] string stepOneMessage,
  [Queue(StepTwoQueueName, Connection = StorageSettings.ConnectionKey)] IAsyncCollector<string> stepTwoMessageCollector,
  TraceWriter log)
  {
   /* do work here */
  }
}
As you can see, there is a static helper class that has common information about shared storage accounts (in this case, I just have one, but you could have configuration classes for each storage account). By making the *QueueName and ConnectionKey properties constants, you can use them as attribute values. This removes any chance of fat fingering the queue names or connection keys. In the static constructor of the Functions class, I'm simply looking for any constant whose name ends with QueueName and is a string type. Then I just create all the queues if they do not exist. This keeps the creation of the queues in the same location as the function and is automated.

Monday, September 18, 2017

Xamarin.Android build Task + $(SolutionDir)

I was recently setting up build automation for a Xamarin.Forms project I'm working on and found that the initial template was not able to build my project. I was getting an error like:

C:\Program Files (x86)\Microsoft Visual Studio\2017\Enterprise\MSBuild\15.0\Bin\Microsoft.Common.CurrentVersion.targets(1987,5):
warning MSB3245: Could not resolve this reference. Could not locate the assembly
"Newtonsoft.Json, Version=9.0.0.0, Culture=neutral, PublicKeyToken=30ad4fe6b2a6aeed, processorArchitecture=MSIL".
Check to make sure the assembly exists on disk. If this reference is required by your code, you may get compilation errors.
For SearchPath "{HintPathFromItem}".
Considered "*Undefined*packages\Newtonsoft.Json.9.0.1\lib\portable-net45+wp80+win8+wpa81\Newtonsoft.Json.dll", but it didn't exist.

Notice the *Undefined* in the considered path.

After a little digging, here's what I found.

In all the other projects in the solution, I include packages using the $(SolutionDir) variable in the HintPath like:


<Reference Include="Ninject, Version=3.0.0.0, Culture=neutral, PublicKeyToken=c7192dc5380945e7, processorArchitecture=MSIL">
  <HintPath>$(SolutionDir)packages\Portable.Ninject.3.3.1\lib\portable-net4+sl5+wp8+win8+wpa81+monotouch+monoandroid+Xamarin.iOS\Ninject.dll</HintPat>
  <Private>False</Private>
</Reference>

Because the Xamarin.Android task is building a project, there is no $(SolutionDir) available. If you use the VisualStudio build to build the Xamarin.Forms solution, it will build find. So how to get Xamain.Android to replace the $(SolutionDir) variable?

Add a Build Variable!

To figure out the value of the build variable, at the top of the logs for the Xamarin.Android build step you'll find a few lines like this:

Build started 9/18/2017 8:59:48 PM.
Project "d:\a\3\s\DEV\App.Mobile.Droid\App.Mobile.Droid.csproj" on node 1 (PackageForAndroid target(s)).
In my case, the directory was d:\a\3\s\DEV\ because in the Get Sources step, I specified DEV as the folder to put the sources into. If you don't do this, it will typically be something like c:\a\1\s\
At any rate, after adding a build variable with this value, the Xamarin.Android task is able to properly find the packages required to build the solution.

Wednesday, August 9, 2017

Application Insights filter to Errors

Application insights is an AMAZING tool for monitoring your application. Using the
Microsoft.ApplicationInsights.TraceListener
package with
Microsoft.AspNet.WebApi.Tracing
captures a great deal of information automatically which has reduced my time to identify bugs dramatically.

The Analytics dashboard allows for quick and easy slicing and dicing of data collected. I recently needed to see all Error Traces and found it to be somewhat indirect. I was expecting severityLevel to be 'Error', but it was an integer. Looking at the TraceLevel enum, Error = 1 so maybe that would match. Nope. Error is 3. I imagine this matches something, but it was not obvious so here is how you can get all error traces in the last 24 hours:


// Find error traces in the past 24 hours
traces 
 | where timestamp > ago(24h) and severityLevel == 3

Monday, June 19, 2017

Disable windows defender on Azure VM

I created a development machine in azure using a VS2017 template. I needed to install a bunch of tools, but windows defender was running a slowed everything down. Typically I just press the Windows Key and search for "Defender Settings" to disable windows defender. However, I was not able to find a way in the VM so I found a power shell command to do it for me. Made installation much faster!


Set-MpPreference -DisableRealtimeMonitoring $true

Thursday, May 18, 2017

Build Agent building PCLs

I've recently been getting ready for product launch, including setting up automated deployment into our development environments. Because of a restriction on the unit tests in the project, we cannot use the hosted build agents available with Visual Studio Online. We have to host our own server and install the build agent there.

After following the instructions here Deploy an Agent on Windows, I found that the agent was responding to builds that were queued thru visual studio online. However, since my solution contained PCL projects, I was getting the following error:

Error MSB4019: The imported project "C:\Program Files (x86)\MSBuild\Microsoft\Portable\v4.5\Microsoft.Portable.CSharp.targets" was not found. Confirm that the path in the declaration is correct, and that the file exists on disk.


Googling did not reveal much information, but I eventually stumbled upon this blog post which indicated the need for PortableLibraryTools. Even today, after installing the MS Build Tools 2015, the targets were not available. Installing this with the /buildmachine switch removed the above errors.

Thursday, February 2, 2017

Disposing HttpRequestMessage

I've been working with HttpClient alot lately (oh, how I wish they created an interface for it....) and have noticed quite a few things come up.

Today I wanted to figure out if I actually need to worry about disposing an HttpRequestMessage which I create and use with HttpClient. Because I'm creating the instance directly and I know it's not a derived version (for example, passed into a method as an argument), I can confidently interrogate the circumstances under which it should be disposed.

If I were accepting it as an argument and was expected to control the rest of the objects lifetime, then I would say you *should* to dispose the HttpRequestMessage because you are expected to.

If you create one and use it, specifically with System.Net.Http.HttpClient, you do not actually need to dispose the request object assuming that you successfully call SendAsync and here's why.

I was looking into the corefx/HttpClient repo and in this case, there is a method that is called which disposes the content after reading the response (with a nice comment).


private void HandleFinishSendAsyncCleanup(HttpRequestMessage request, CancellationTokenSource cts, bool disposeCts)
{
    try
    {
        // When a request completes, dispose the request content so the user doesn't have to. This also
        // helps ensure that a HttpContent object is only sent once using HttpClient (similar to HttpRequestMessages
        // that can also be sent only once).
        request.Content?.Dispose();
    }
    finally
    {
        if (disposeCts)
        {
     cts.Dispose();
        }
    }
}


This method is called in a finally block as part of sending the request so it should always get called even if there is an error. I'm not sure there's really anything else to dispose aside from the content so its probably good enough, but I couldn't find any information or source code to persuade me one way or another.

The helper methods for Post, Get, Delete, and Put do not wrap the newly created HttpRequest created in a using statement or make any additional attempt to dispose.

public Task GetAsync(Uri requestUri, HttpCompletionOption completionOption, CancellationToken cancellationToken)
{
    return SendAsync(new HttpRequestMessage(HttpMethod.Get, requestUri), completionOption, cancellationToken);
}

public Task PostAsync(Uri requestUri, HttpContent content, CancellationToken cancellationToken)
{
    HttpRequestMessage request = new HttpRequestMessage(HttpMethod.Post, requestUri);
    request.Content = content;
    return SendAsync(request, cancellationToken);
}

public Task PutAsync(Uri requestUri, HttpContent content, CancellationToken cancellationToken)
{
    HttpRequestMessage request = new HttpRequestMessage(HttpMethod.Put, requestUri);
    request.Content = content;
    return SendAsync(request, cancellationToken);
}

public Task DeleteAsync(Uri requestUri, CancellationToken cancellationToken)
{
    return SendAsync(new HttpRequestMessage(HttpMethod.Delete, requestUri), cancellationToken);
}


I was also looking into the mono version, which does not dispose the request message or its content for you.

So, if you are creating an HttpRequestMessage and passing that message to the SendAsync method of a System.Net.Http.HttpClient, you can rest assured that the request has been disposed for you. If you have reason to believe that an exception may be thrown between creating the message, and calling SendAsync, a using statement would ensure that it is disposed. HOWEVER, even in this case, the only thing that actually gets disposed is the Content property and of the standard content types, only StreamContent actually needs to be disposed. If you are using, say, StringContent, it does not need to be disposed anyway and therefore the message does not need to be disposed.

Again, if we were considering the case of accepting method parameters which we did not create, you can not make these assumptions, but for code which looks like this, you should be pretty safe!

/// <summary> Gets the single, shared HttpClient instance </summary>
protected HttpClient Client {get;}

public async Task<Order> GetOrder(string orderId)
{
    // this message will be dispose when SendAsync is awaited
    HttpRequestMessage getOrderMessage = new HttpRequestMessage(HttpMethod.Get, $"api/orders?orderId={orderId}");

    // there is not really a chance for an error here...
    using(HttpRepsonseMessage response = await this.Client.SendAsync(getOrderMessage))
    {
        response.EnsureSuccessStatusCode();
        return await response.Content.ReadAsAsync<Order>();    
    }
}